
Products
Fast, Reliable, Everywhere
Solutions
Efficient, Innovative EV Charging Solutions.

Installing a DC fast charger at home is a topic of interest to many electric vehicle (EV) owners who want to improve their charging setup to reduce charging times. Installing DC fast chargers in residential homes is generally not recommended due to the high power requirements and the need for major infrastructure upgrades. This article explores the requirements for a home EV charging solution and examines whether it is practical or even possible to install such high-power equipment in a standard home environment.
DC fast charging, also known as Level 3 charging, is an electric vehicle fast charging technology that delivers direct current (DC) directly to the battery, charging an electric vehicle's battery to 80% in just 20-30 minutes, improving electric vehicle long-distance travel and reducing charging downtime. It has a transmission range from 50 kW to 350 kW and directly bypasses the onboard charger. It converts alternating current (AC) to DC. In addition, the combination of DC fast chargers with renewable energy sources enhances the environmental benefits of electric vehicles and supports the transition to a sustainable transportation system.
When comparing DC chargers to other types of electric vehicle (EV) chargers, such as AC Level 1 and Level 2 chargers, there are several factors to consider when understanding the differences.
1. Charging Speed and Efficiency
DC Chargers: DC chargers, or DC fast chargers, are the fastest type of EV chargers on the market today. They can charge an EV battery to 80% in 20 to 30 minutes. No conversion is required to power the battery directly.
AC Chargers: AC (alternating current) chargers are available at Level 1 and Level 2, which are slower. Level 1 chargers use a standard household outlet (120 volts) and take 8-12 hours to fully charge an EV, while Level 2 chargers (240 volts) take about 4-6 hours.
2. Installation and Infrastructure Requirements
DC Chargers: Installing a DC fast charger is generally more complex and expensive. It requires significant power output and infrastructure modifications that may not be possible in all locations without significant investment.
AC Chargers: Level 1 chargers do not require installation beyond a standard outlet. Level 2 chargers may require some electrical upgrades, such as installing a 240V outlet, but these upgrades are generally fewer and less expensive than those required for DC chargers.
3. Cost Impact
DC Chargers: The high speed and efficiency of DC chargers come at a higher cost. Equipment is also expensive, and installation costs are higher due to the need for specialized infrastructure.
AC chargers: AC EV chargers are more economical both in terms of charger cost and installation. Level 1 chargers are generally included with the purchase of an electric vehicle and use existing household outlets, while Level 2 chargers, while more expensive than Level 1 chargers are still cheaper than DC chargers.
4. Use Scenarios
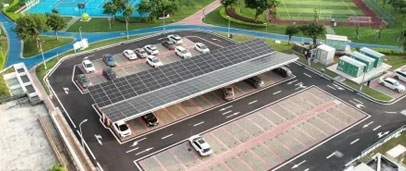
DC chargers: Best for commercial use where fast charging is required, such as public charging stations along highways and urban areas where users need a quick turnaround.
AC chargers: For home use, where a car can be charged overnight with a Level 1 charger, or for daily commuting needs, where a Level 2 charger taking several hours to fully charge is acceptable.
5. Compatibility and Accessibility
DC chargers: Not all electric vehicles are equipped with the fast charging capabilities offered by DC chargers, and different vehicles may require different connectors.
AC chargers: These chargers have wider compatibility, as almost all-electric vehicles are equipped to charge from both Level 1 and Level 2 charging stations.
6. Environmental Impact
DC chargers: While they offer fast charging, their high power requirements mean they can have a significant impact on the local grid and can increase demand for peak power unless paired with renewable energy sources.
AC chargers: Generally have less impact on the local grid. Level 1 and 2 chargers, especially when used during off-peak hours, can be more sustainable and are easier to integrate with home solar installations.
These distinctions provide insights into which type of charger is best suited for specific needs, settings, and vehicle types, balancing cost, convenience, and charging speed.
For home installation of home car charging stations, there are primarily two types suitable for most residential settings:
Level 1 chargers are best for overnight use and require no additional installation with existing outlets, making them cost-effective. Level 2 chargers, though pricier, charge faster and are a good investment for frequent users.

Installing a Level 2 charger for an electric vehicle involves several steps and requirements to ensure safety and functionality:
Installing a Level 2 charger can increase charging speeds and improve the long-term usefulness and value of your electric vehicle. Proper installation ensures optimal operation and avoids hazards or failures that can result from improper setup.
Installing a Level 2 charger for your electric vehicle involves several steps and considerations to ensure it is done safely and effectively. Here’s a general guideline on how to install a Level 2 charger:
By following these steps, you can ensure that your Level 2 charger is installed safely and ready to provide faster charging for your electric vehicle. Always consult with a professional and adhere to local regulations to ensure the installation is done correctly.

When you consider installing an EV charging setup at home, it's advisable to look into high-quality, reliable solutions. For those interested in cutting-edge charging technology, especially in commercial settings, PIWIN offers a wide range of products to meet a variety of charging needs. PIWIN specializes in advanced DC fast chargers and is known for its efficiency and powerful performance. Whether you are planning to upgrade your commercial facility or seeking the best EV charging technology, explore PIWIN's products on PIWIN chargers to find the best fit for your needs.
There are significant challenges to installing a DC fast charger at home due to its high power requirements and the extensive electrical upgrades it requires. These obstacles make it impractical to consider DC fast charging as a viable option for most homeowners. Instead, Level 2 chargers balance speed and ease of installation, making them a more appropriate and economical option for residential settings. They offer faster charging times than Level 1 chargers and can be installed with relatively minor modifications to a home's electrical system.
Related Reading: 5 Differences Between AC and DC Charging
